How to Create Memberships with Drupal Ubercart
One of our clients was looking for a solution for their user base to purchase yearly memberships with Drupal. Members would be able to access additional sections of the website. After searches on the Ubercart website and Drupal.org forums, I found a pretty good solution. Ubercart is an extremely powerful e-commerce system and their support for "buy a role" makes memberships a breeze (once you know how to set it up of course!). Here is the step-by-step solution I set up for our client:
 I hope this gives you a good starting point to setting up memberships on your Drupal website!
Install and enable modules
Install the following modules: After module install, enable the following modules (don't forget to set user permissions):- Ubercart - core (required):
- Enable all modules
- Ubercart - core (optional):
- Payment
- Reports
- Roles
- Ubercart - extra:
- Restrict Qty
- Ubercart - payment:
- Credit Card
- PayFlow Pro
- Test Gateway
Role Setup
- Create a new user role for your membership and set permissions for what the subscriber can access. If you need to allow members to access only certain pages or menu items, try out the node access module or the menu access module.
- Go to Content management > Create content > Product
- Type in the title for your membership, description, if desired, and the SKU number field - you can use the convention "001" for your first product, "002" for the second, and so on. Enter your subscription "Sell price". Leave everything else as default and click the "Save" button.
-
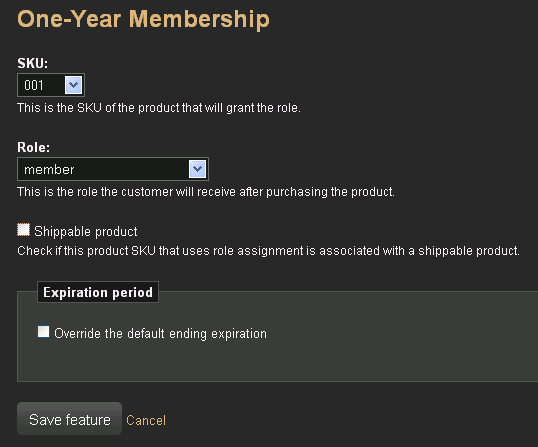
Click to edit your product again and click on the sub-menu labeled "Features". In the drop-down box for "Add a new feature," select "Role assignment" and then click "Add". On the next page, choose your SKU, role you want assigned and then expiration period. Deselect the "shippable product" option. Click the "Save" button.
- If you want to disable users from adding multiple quantities, select and add "Restrict Qty" under the features submenu. A status will display saying "Users may only purchase one of this product at a time."
Conditional actions
The power in "buy a role" support in Ubercart lies in the Conditional actions section. By default, several triggers and actions are set up for you.- Go to Store administration > Conditional actions
- Scroll down and you will see a condition titled "Grant or renew purchased roles." If you select "edit" and review the "Conditions" and "Actions" sub-menus, you will see that the trigger for this is if a payment is marked as "Completed," the system will assign or renew a role for a user (if specified in the product features setting).
- Go back to the Conditional actions main page, edit the condition titled "Update order status on full payment" and select the Conditions sub-menu. You will see the Condition is "If the balance is less than or equal to $0.00." Now go to the "Actions" sub-menu and expand the action menu. You will see that the action is to update the order status to "Payment Received". This does not work well with our role condition, unless you want to manually mark payments as Completed. Instead, change "Payment received" to "Completed" and click the "Save changes" button.
- Also, review the role notification conditions on the main Conditional actions page. You can edit role notification email messages by clicking edit and going to the "Actions" sub-menu.
Payment Setup
- There a multitude of payment options to use, but for this example we are going to use PayPal PayFlow Pro. You can set up a test PayPal PayFlow Pro account by going through the steps of an actual account and exiting your browser when you reach the credit card information page. You will then receive an email with your test account information. You will need the API Credentials for the test account.
- On your Drupal site, go to Store administration > Configuration > Payment settings > Edit > Payment methods
- Make sure "Credit card" is enabled and select "PayPal PayFlow Pro" as the Default gateway. Under "Credit card settings" there is direction to create a directory called "keys" outside your root Drupal installation directory so that the system has a secure place to store the encryption key. You may need to work with your hosting company to obtain the needed permissions to create this directory and have Drupal write to it. Once the directory is created, enter the path to the directory in the field labeled "Card number encryption key filepath." If your "keys" directory is directly outside your Drupal site directory, your path is "../keys". Scroll down and click "Save configuration".
- Go to Store administration > Configuration > Payment settings > Edit > Payment gateways
- Under "PayPal PayFlow Pro Settings," keep the mode set in "Test" mode, scroll down to the "API Credentials" and enter your API info for PayPal PayFlow Pro. Note: You may also notice a setting for "Recurring Settings" that allows recurring subscription payments. This feature is currently in development, so you may come across bugs if enabled. Click "Save configuration".
- Now test it! Log out of your site, go to your node and add your membership product to your cart (make sure role permissions are set for ubercart). Continue to checkout and enter your fake credit card info (see PayPal's PDF on testing credit card transactions).
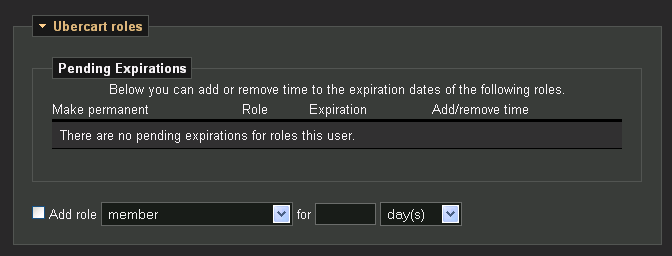
Role Expirations
User role expirations can be viewed under User management > Users > Role expiration. Also, you can add an expiring role to an existing user (or create one, then edit). On the edit user page, scroll down to "Ubercart roles" and add a role. It will work just as if the user had bought the membership themselves.
I hope this gives you a good starting point to setting up memberships on your Drupal website!
