How to use Views RSS to create a Mailchimp RSS email campaign
Mailchimp provides a great tool for automatically sending out emails that pull information from RSS feeds (read more from Mailchimp on this topic at Create an RSS-Driven Campaign with the Campaign Builder). However, when I first tried out the Mailchimp RSS campaign builder with Drupal's out-of-the-box RSS feed, there were some things that didn't work well. I was using a image field in my blog called 'featured image', and this image was broken in the Mailchimp email, as it was using a relative URL. Also the read more link wasn't working, as it too was using a relative URL. This post will step you through how to set up your Drupal RSS Feed to display the desired information (title, featured image, trimmed body text, read more link), as well as using absolute URLs. It will also tell you how to set up your Mailchimp RSS campaign using the fields you are displaying in your RSS Feed.
TWO BASIC REQUIREMENTS FOR THIS SETUP
- Views RSS module - this module provides more granular control of the fields that are displayed in our RSS feed than what is provided out-of-the-box with Views.
- Views RSS Media Elements module - if you want to control how images are displayed in your feed, or you have an image that is displayed in an image field (rather than in the body of your node), you'll need this as well.
Step 1: Set up your RSS feed Using Drupal's Views RSS Module
1a. Views RSS: Add the desired fields
Install and enable the Views RSS, Views RSS: Core Elements, and Views RSS: Media (MRSS) Elements modules.
Add a new view (admin/structure/views/add) for your feed. Show Content of whatever type (in this case, Blog Post) you want to include in your feed. Create a page and select the 'Include an RSS feed' option. Click Continue & edit.
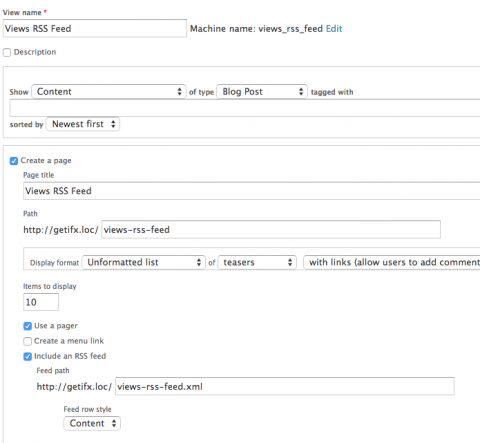
Click on the Feed display option at the top so you're editing your Feed (rather than the Page), and then under Format click on RSS Feed.
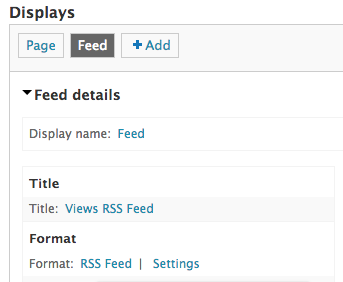
Select the RSS Feed - Fields option and hit Apply.
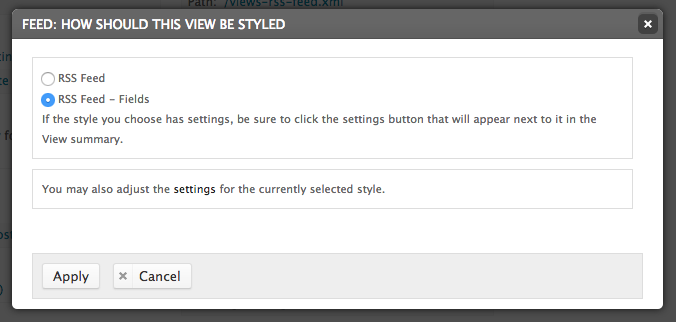
You'll be presented with a Feed: Style Options window next. Just hit Apply and we'll revisit this once we've added all of our desired fields.
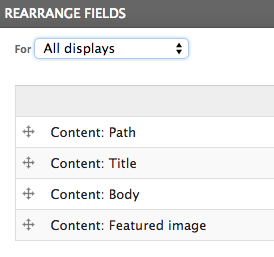
Now we're going to add our Body, Featured Image, and Path fields that will displayed in our feed. Click on the Add link in the Fields area, and select Content: Body, Content: Featured Image, and Content:Path (use Path rather than Link as it will allow us to use Absolute URLs). Click Apply (all displays).

![]()

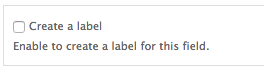
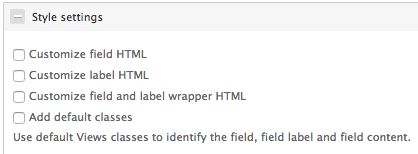
For the Content: Body field uncheck 'create a label', and under Style settings, uncheck Add default classes (we don't need any added html around our fields).
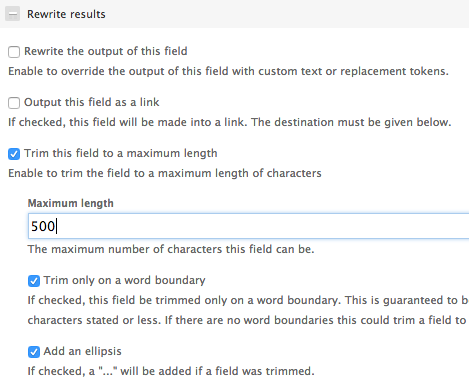
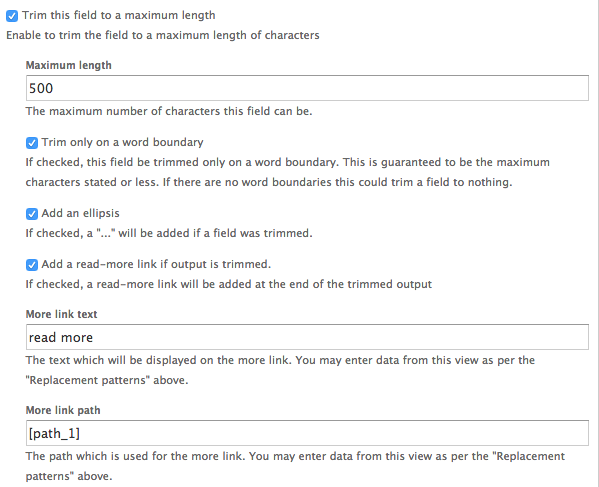
Also, under Rewrite results, I'm going to trim the body to 500, since we don't want the whole blog post going out in the email. We will return to this field in a moment as well to set up the read more link, but we need to do some additional configuration first.
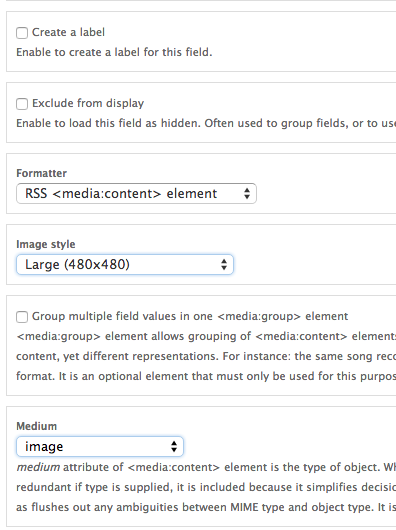
For Featured Image, uncheck Create a label, and for the Formatter, select RSS <media:content> element. This is why we installed the Views RSS Media Content module - it gives us the option to format an image field with this tag. Mailchimp RSS email campaigns won't recognize image fields without the <media:content> tag. For image style, select something smallish (for this example, I used Large, 480x480) - one caveat here is that I haven't figured out how to make Mailchimp RSS email campaigns have responsive images. For Medium, select image. I don't think this is required, but I did it to be on the safe side. Click Apply (all displays).
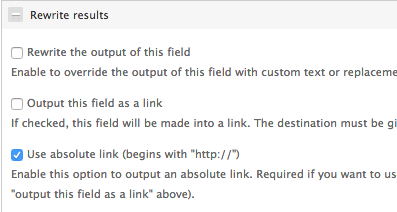
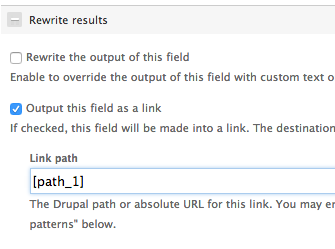
Lastly for the Content: Path field, uncheck Create a label, under Style settings uncheck 'Add default classes', and under Rewrite results, check Use absolute link. We will need this in the Mailchimp campaign so our Read More link uses an absolute path. Click Apply (all displays).
Now we'll do some quick cleanup to make sure we use absolute URLs. Rearrange the fields so Content: Path comes first. We do this so the Content: Path replacement pattern is available for all of our other fields. Click Apply (all displays).
To get the Title to link to the absolute path, click on Content: Title, then uncheck 'Link this field to the original piece of content' - the link was broken in Mailchimp since it was a relative link. Instead of this, we will then look under Rewrite results, and select Output this field as a link. Scroll down a little to the Replacement Patterns area, and use the replacement pattern for the Content: Path (it may be different for your setup, so be sure to use what it says on your site for Replacement pattern, don't just copy what I've done here). Then click Apply (all displays).

We will now add a Read More link to the Body. Click on the Content: Body field, and under Rewrite results, click on 'Add a read-more link if output is trimmed'. We will use the same replacement pattern here that we used above for the title, in this case [path_1], and enter in something nice like 'read more' for More link text. Click Apply (all displays).
1b. Views RSS: map fields to RSS elements
Now that we've finally got all of our fields set up, we need to map those fields to the desired RSS elements. We will need this for the Mailchimp RSS template in step 2. Under Format click on the Settings link for RSS-Feed - Fields. We don't need to do anything to the Channel elements. Under Item elements: core, set title to Content: Title, link to Content: Path, and description to Content: Body.
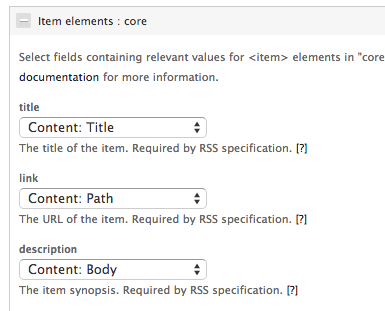
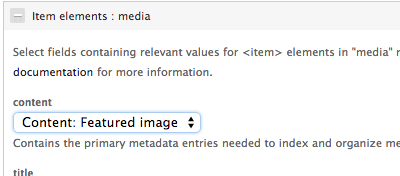
For the Item elements : media, set content to Content: Featured image. Then click Apply.
Make sure to save your view, and check an <item> in the RSS that is displayed below to make sure that your title and read more links are using absolute URLs. Still with me? Now we're going to use this view to set up the Mailchimp RSS campaign.
Step 2: Set up your Mailchimp RSS Campaign
Log in to your Mailchimp account, and click on the Create Campaign link, and then select RSS-Driven Campaign.
On the RSS Feed and Send Timing screen, enter in the RSS Feed URL - it should be something like http://mysite.com/feed.xml (you can set this under the Feed settings in the Feed view you just created.) For you to be able to preview what your feed will look like, you will need to do this on a site that is available to Mailchimp, so you can't test something you're doing locally on your machine. You don't need to worry now about when you'll be sending, since we're just testing. Click Next (bottom right of screen).
On the To which list shall we send? screen use a test group since we'll be doing testing here - don't send to your clients! Click Next.
On the Campaign Info screen, again this is just testing, so you can set it to whatever you'd like. I initially just left almost everything as defaults. Click Next.
On the Change Template screen, pick whatever you'd like, again I just left it all as default initially. Click Next.
We're finally at the place where all of our hard work setting up our feed with Views RSS is finally going to be useful. We're going to use RSS Merge Tags to customize how the content appears for the RSS driven campaign. Check out this Mailchimp article for a full list of RSS Merge Tags.
If you hover over the default text Mailchimp displays, you can then edit by clicking on the pencil icon.
In this example, we want to display our blog post's title, our featured image, and the trimmed body text with the read more link. We'll tell Mailchimp we're going to do this totally custom, so we'll use the RSS Item tags. The image below is from the Mailchimp Merge Tags article.
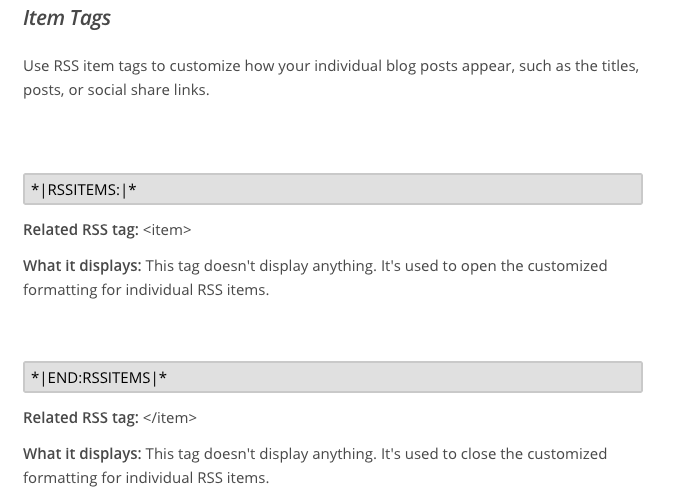
We'll open and close the RSS Items tags to start, and then put all of our custom tags in between the RSS Items tags. We want to display our Title, trimmed body (with read more link) and image, so this is what our Text should look like:
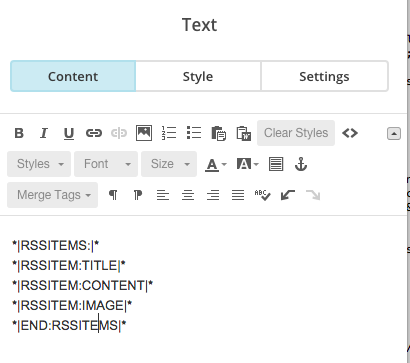
A little explanation - if we read the documentation from Mailchimp in terms of the RSS Merge Tags, we can see the *|RSSITEM:TITLE|* looks for the RSS tag <title>, *|RSSITEM:CONTENT|* looks for the RSS <description> tag, and the *|RSSITEM:IMAGE|* looks for the <media:content> RSS tag (the media:content tag is provided by the Views RSS Media module). If we look at the XML that is output from our Views RSS Feed, we will see the fields we set previously use those exact tags. Yay!
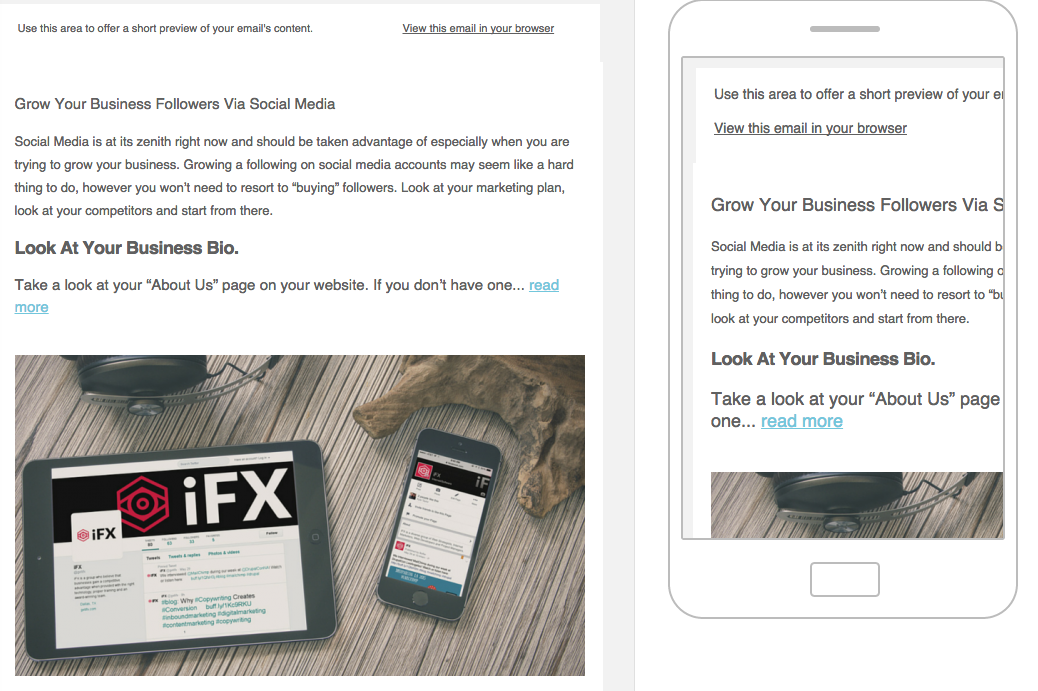
To preview our email, click on the Preview and Test link at the top of the page, and Enter Preview Mode. Hover over your links to make sure they are linking to the correct place and you should see they are since we used absolute links in our Views RSS setup.
You can then modify your feed and Mailchimp template to your heart's content. One gotcha, the Preview option for Mailchimp seems to be cached somehow, so if you change your Views feed, to make sure Mailchimp isn't using some cached version of the feed, change the feed URL in your View, and then update the URL in the RSS Feed setting for your campaign. Kind of annoying, but it's worth it since you will be sure this way to see the updated feed preview.