A Basic Guide to Your Ecommerce Analytics
Google Analytics is a powerful tool for tracking and analyzing your visitors' behavior on your website. Naturally, if you've invested in an eCommerce site, then you'll want you to take the proper steps to ensure your site is generating an ROI for your business.
In this post, I'm going to walk you through the basic process of setting up your Google Analytics so that you can gather optimum insights from your online business' data.
Get Started with Ecommerce Tracking
Turning on Ecommerce Tracking in your Google Analytics account can give you access to Ecommerce Reports which will enable you to:
- Segment and analyze your data to see exactly which traffic sources, keywords, marketing campaigns, and products are generating the most revenue. This will help you pinpoint where you should allocate your financial resources.
- Get insights to your transactions such as how much revenue you're getting per transaction and how many products customers are purchasing per transaction.
- Gauge your sales cycle by uncovering how much time and how many sessions it takes customers to make a purchase decision. This will show you whether you have a stable sales cycle or whether this varies based on the season.
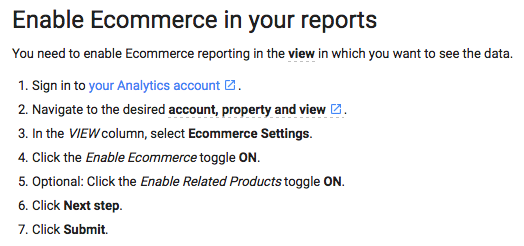
Here's a screenshot from Google Support on how to set up your Ecommerce Tracking:

There is a common misconception that these are the only steps you have to take to gather your online website's data. However, to really obtain a full reflection of your website's data, you'll also want to make sure you're using best practices regarding goals and funnels.
Identify What's Important with Goals
You use goals in Google Analytics to track of the most crucial aspects to your business by tracking how often visitors complete designated actions. Goals are configured at the view level and can be applied to specific pages to help you determine which pages and features of your site are encouraging the most conversions.
Whenever a user completes an action specified as a goal, Google Analytics documents the action as a conversion. You can specify the type of actions you would like to record as a goal by utilizing Google Analytics' 4 goal types:
- Destination: Triggered when a user reaches a certain URL Destination like a thank you or confirmation page.
- Visit Duration: Triggered when a user spends a specific amount of time on the site. You can also set it if you want your users to spend a specific amount of time on the site. If you have a support section on your site and you want your visitors to find solutions quickly.
- Pages/Visit: Triggered when a visitor reaches a specified number of pages within a visit. This can also apply to a support section.
- Events: Triggered when a visitor completes an action defined as an event such as a video play, ad click, download, or social share.
How to set up your goal settings:
- Sign into your Google Analytics.
- Select the "Admin" at the top right and navigate to the account you want to add your goals.
- Under the view column, select "goals."
- Select "+ New Goal."
- Choose to configure your goal with the following options:
- Template: designed to help you set common business goals. This is especially helpful for beginners. You can edit any of these fields before saving the goal to fit your site's needs.
- Smart Goals: This is only applicable if you're using Google Adwords.
- Custom: Use this option, name your goal, and select your own goal type as detailed above.
- Name your goal and set up your goal details.
- Before you save be sure to set up your funnel (details in next section).
You can create up to 20 goals per view. If you need an in-depth overview on how to set up your Goals, check out Google's instructions on how to create, edit and share goals.
Visualize with Funnels
After you save URL goals, it is highly recommended that you use another essential Google Analytics feature: funnels. Your visitors' site behavior can be organized into individual steps until they make a purchase. For example, you could use your funnel to visualize your users' progress from placing items into their shopping carts to the payment page, and subsequent thank you page. Funnels help you visualize this process, offering the conversion data between each step along the way. This will help you determine:
- Whether the layout of your website is designed to encourage your visitors to convert.
- Which areas of the site are causing users to drop out of the funnel.
- If there are any technical issues prohibiting users from completing their purchase.
How to set up your funnels:
- Before you save your URL goal, switch the funnel option to "on."
- Enter the name of the pages and their corresponding URLs along the predicted path. A common path a user might take might be: Homepage > Product Page > Cart > Checkout > Shipping > Payment > Thank You
- Decide if you want this path to be "required" or not. Required means that people can only get to the destination page by starting at your first designated step (i.e., Homepage). If a user were to enter the funnel through a different page, this data would be excluded from your funnel reports. If you would like to monitor a specific customer path, then switch required to "yes." Otherwise, leave the required button at "no."
You can add up to 10 stages in your funnel. After you've set up your stages, you can find this data under your reports in the "Funnels Visualization" Report.
Ecommerce in Google Analytics can seem confusing at first sight. However, the conversion data Google Analytics offers when using the appropriate methods to construct goals and funnels can be indispensable to your business.
Did this blog post help? We'd love to hear from you in the comments below!

